Wednesday, March 31, 2010

Restaurant review: Eleven

Are you sitting down for this?  You should be.  And I certainly need to be, reliving my out-of-this-world experience at Eleven so I can rehash all of the details accordingly.  Whew, here goes.

Since I love to cook at home so much, whenever I head out to a restaurant I like to do some thorough research to make sure I'm in for a fantastic culinary experience.  After numerous recommendations from friends and positive interwebs reviews, we headed to Eleven on Saturday night.  Eleven is located in the Strip District, just where it meets the downtown area of Pittsburgh.  Parking is valet ($5) or street, of which there is a ton, so worry not.  I really loved the layout of the interior -- big area and can obviously accommodate many, but each booth or table is sectioned off intimately, making you feel like the restaurant is all yours.

Service was friendly and timely without being too chatty.  (The guys discussed March madness briefly ,and I barely noticed.  Well done, waiter sir!)  The bread, brought around throughout the meal in large baskets by a waiter (or what I deemed the village baker) rather than being sat on your table, was not only a pleasant surprise but absolutely delicious -- I tried the Tuscan Parmesan and the foccacia.  Mmm.  We skipped the appetizers, even though that sounded so interesting, because we'd been warned to save ourselves for dessert.  (Thank you, wise friends.)

For my entree, I ordered the wild Alaskan halibut with shrimp risotto, leeks, mushrooms in a lobster reduction.  The fish was cooked perfectly and just flaked off onto my fork.  I'm totally a sucker for risotto in its simplest form, so adding the shrimp, mushrooms and leeks firmly placed me on Cloud 9.  Portion size was perfect -- not too tiny and dainty, but too much that I couldn't finish my food.  My better half ordered the pork, which he claims was so tender and juicy that it tasted like a good steak.  The apples, cabbage and potatoes were great matched with the pork.  I'm not a big pork fan, but even I have to admit that was some delicious "other white meat."

And, for the grand finale, dessert.  Of course I had eyed up the choices days before we headed to Eleven.  What can I say?  I'm a planner by nature.  I try to order things that I wouldn't normally make myself, and pretty much every choice fit that requirement.  The banana cream pie jumped out at me, and I couldn't say no.  I wish I had brought my camera for just one picture of this after dinner beauty.  I'm talking the prettiest and most delicious-looking dessert I've ever seen.  I'd say it as more of a deconstructed banana cream pie: layers of caramelized sliced bananas, dulche de leche mousse, and housemade graham crackers.  Oh my goodness.  There aren't enough words in the English language to describe this tower of a dessert, nor do it justice.  Just trust me.  (Update: I just found a picture via Google images.  Ours was a little taller and had about three layers of each component, but you get the idea.)


I have to say that Eleven exceeded every expectation I had, and I had rather high ones going into this experience.  It's tied for my favorite restaurant ever.  I'd have to go back again to see if the second trip is as good as the first, but hey, I'm willing to put in that kind of work :)

Have you been to Eleven?  If so, what did you think? 

Eleven on Urbanspoon

Tuesday, March 30, 2010

Quickest doughnuts


Oh, Tuesday.  You will never be the same to me after this month of delectable doughnut recipes.  If you've been keeping track or you're new (welcome!), here is a review of what doughy delights have been made: There have been traditional yeast doughnutsChocolate cake and apple cider doughnuts have brought a level of flavor to homemade doughnuts that I never thought possible.  And for the "healthier" (relatively speaking) doughnut fan who loves a surprise, a Nutella-filled muffin that tastes so much like a doughnut you'll swear that hole in the middle isn't necessary at all.


This doughnut is the quickest of quick when it comes to preparation.  The frying method is the same, but no long rising times for the yeast and so few ingredients that I'd bet even my most kitchen-phobic of friends have everything in their cabinets to make this right now.  And, in keeping with this week's theme of making the most of an almost bare kitchen stock, this required a measly four ingredients.  Okay, okay.  If you are going to be a stickler and count water as an ingredient, that's five total ingredients.  Shhh.  Please don't rain on my doughnut parade.


These doughnuts are much smaller than the other varieties since I was planning to take them to work the next day.  I figured I should try a different size just for experiment's sake, too.  The pizza dough mix gave these tiny doughnuts a nice crisp exterior and a really airy (I mean, pockets of air amidst the fluffy dough) interior.  I used cinnamon sugar as a classic coating only after I realized I had used up my stash of powdered sugar to ice a birthday cake I made the previous weekend.  But hey, don't let my kitchen misfortunes limit your creativity with doughnut toppings!  Try powdered sugar, melted chocolate (milk or even white) with some rainbow sprinkles, or a simple glaze immediately rolled in toasted coconut.  The sky is the limit!  (Beware of falling doughnuts...)


Quickest Doughnuts
-makes 15 two-inch doughnuts

1 package just-add-water pizza dough
Vegetable oil, for frying
2 Tablespoons granulated sugar
1/2 teaspoon ground cinnamon

Prepare the dough as instructed on the package -- mine said to add 1/2 cup of warm water, stir until just moistened and cover for 5 minutes.  Roll out the dough on a lightly floured surface to 1/4-inch thickness. Using a floured 2-inch cookie cutter, cut out doughnut rounds. Using a floured 1-inch cookie cutter (or a trusty water bottle cap), cut out a hole in the center of each doughnut. Gather the dough scraps and reroll. Cut out more doughnuts until all of the dough has been used.

Whisk the sugar and cinnamon in a medium bowl to blend; set aside.  Pour enough vegetable oil in a small saucepan to reach a depth of two inches.  Heat the oil over medium heat until a deep-fry thermometer registers 350F.  Working in small batches (2 per for me), fry the doughnuts until they puff but are still pale, about 45 seconds per side.  Using a slotted spoon, transfer the doughnuts to a cooling rack over (or paper towels lining) a cookie sheet. Cool slightly. While the doughnuts are still warm, generously coat each with the cinnamon sugar.  Serve warm with a glass of milk and a good book (not for eating).  These can be stored in a sealed container at room temperature for up to a day.

-----
And that's it for doughnut month!  (Thanks to BH for the idea!)  Did you try any of the recipes?  What did you think?  What was your favorite?  I've gotta say that while I enjoyed them all, my favorite was certainly the traditional yeast doughnut, but a close second was the not-at-all traditional "doughmuffin."  I will definitely be making these in the future and each recipe is perfect for a different occasion.  Happy eating!

Monday, March 29, 2010

Shortcut vegetable pot pie


Welcome to I'm-going-to-live-on-whatever-I-have-left-in-my-kitchen week!  Knowing that I'll be heading home to my parents' house mid-Friday for the Easter holiday this weekend, I just can't justify going on a huge grocery trip for 5 days worth of meals.  Sure, I have milk and a few eggs left, but it's slim pickins in the pantry and refrigerator.  And I really mean slim... except in the cheese category.  I always have at least three varieties of cheese.  Obsessed much?  No comment.  But what else can I make?

Every now and then I like to starve challenge myself to see what I can do with ingredients that tend to be neglected -- in this case, the bag of mixed vegetables and almost empty package of phyllo dough in the freezer, and a can of cream of chicken soup in the pantry.  You should know that this isn't a traditional pot pie, but, surprisingly (hey, this was an experiment, after all!) equally as delicious and satisfying.  Not enough flour and butter for traditional pie crusts and no chicken.  And it's actually a little healthier without the oodles of butter in the crusts.  By brushing the phyllo dough with oil, the sheets take on a nice golden color and add a light crunch to the creamy vegetable filling.  The condensed soup is a much easier version of the flour-milk-and-butter roux and more flavorful, in my opinion.

[straight from freezer to stove-top]

[instant chicken flavor]

And hey, the result was a success -- a creamy, oozing cheater's vegetable pot pie that warmed every bone in my body on a cold and rainy Sunday.  A filling and satisfying lunch to give me the energy I needed to scream my face off at an evening Penguins hockey game.  Yessssssssss :)

Note: If your food stock isn't quite as pathetic as mine and you have some chicken lying around, feel free to bake two chicken breasts, let them cool, and shred them to add chicken to the pot pie when you add the vegetables to the soup.

Tip: If you have leftover onion and don't plan to use it anytime soon, dice it up and put in a freezer bag for later.  Then, whenever you need a little onion for a recipe, just measure out what you need from the freezer bag.  Because the pieces of onion are small, they'll thaw in no time and save you tons of prep time.

[trimmed and seasoned phyllo dough crust]


Super Shortcut Vegetable Pot Pie
-makes 6 servings

1 Tablespoon olive oil
1/2 cup diced onion (I had a bag of diced onion in the freezer)
1 (16 ounce) bag of frozen mixed vegetables
1 can condensed cream of chicken soup
1/2 teaspoon garlic, minced
1 Tablespoon lemon juice
Salt
Pepper
6 sheets phyllo dough, thawed (let sit at room temperature, sealed in plastic for 30 minutes)
Olive oil, for brushing

Preheat oven to 400F.  Heat olive oil in large skillet over medium heat.  Add onions, vegetables, garlic and 1/2 teaspoon salt and 1/2 teaspoon pepper.  Cook until vegetables have thawed (don't worry, they'll soften further in the oven) about 4-5 minutes.  Remove from heat.

In a large bowl, add condensed soup and lemon juice.  Stir in vegetables until thoroughly mixed.  Pour mixture into 9-inch glass pie plate.  Place two layers of phyllo dough over dish and mixture.  Brush lightly with oil.  Repeat two more times.  Sprinkle top layer of dough that has been brushed with oil with a little salt and pepper.  Using a knife or kitchen scissors, trim dough so it fits over dish.

Bake in oven for 20 minutes or until mixture is bubbling.  Cool on wire rack for 5 minutes.  Serve with buttered biscuits or alone, both will warm your tummy just as well.

Friday, March 26, 2010

Spring things

Happy Friday! Not quite as warm out there as I'd like, but spring is still here, whether Mother Nature wants to admit it or not. And hey, spring means Easter is almost here, and Easter means adorable baby animals of sorts dressed (however ridiculous they may look) in festive outfits. In keeping with the other day's theme of Peeps, some real peeps:
That was an entry in the 2010 Martha Stewart Easter Pets contest.  The rest of the winners can be found here.

On tap for this weekend -- making a cake for a friend's 7-year-old daughter's rock star birthday party, a long-anticipated dinner date at Eleven, and a Penguins game on Sunday afternoon.  What a variety :)  Pictures next week, and the final chapter in March doughnut month.  Have a fantastic one!

Thursday, March 25, 2010

For the wine ignoramus

...like me.  These are hilarious, honest, and still sweet.  After all, as my Mom always says, it's the thought that counts.


Seen here.  Since they are from a UK-based company, I think these tags could be easily made with very little computer design prowess or even hand-written.

Wednesday, March 24, 2010

It's a Peep's world

Oh Peeps, if you could only know the love and joy you bring to kids and adults every spring.  And, well, I suppose there are other varieties available throughout the year, but the original yellow Peep is the best.  Though it's no secret that I don't wait until Easter to enjoy the plethora of chocolates and sweets available in the spring, for some reason I just can't bring myself to feast on Peeps until that Sunday.  I feel that the act of waiting creates a healthy anticipation and appreciation for these fluffy sugar-coated fowls.


If you're also waiting to enjoy these little gems, here are a few things to distract you (or make you want them more).  Seriously, ten bucks says I cave and go out to buy a box at lunch today.  It's not like I bought a bag of Whoppers Mini Robin Eggs for the office candy dish and then proceeded to eat 95% of it.  Woops.
  • A slide show of last year's winners and entrants for the Pittsburgh Tribune Review's Peeps Show Contest.  How simple and clever is the winner entry entitled "The S'mores Hotel"?!
  • An article from USA Today about the opening of a Peeps store in Washington, D.C.  And the interwebs home of said Peeps store.
  • Combing two of my very favorite things: hockey and Peeps.  Ha ha!  Honestly, I love that the helmets for the Peepitals look like diapers.  And that "Crosby's Crispy" sign?  Pure genius.  I'm not sure how the maker of this diorama felt, but a crispy Peep is the best kind of Peep.  Ergo, Crosby is the best kind of hockey player.  Solid logic, right? 
  •  And, finally, should you feel your creativity overflowing and need a healthy (or delightfully caloricically -- yes, I just made that word up -- empty) outlet for said energy, the Trib has a Peep diorama contest for 2010.  Rules and dates can be found here.  Annnnnd I'm two days late on that one, but check back there for the winners announcement on April 3.  Did any of you make a Peeps diorama?  Please send pictures, if so! 

Update: At 1:20pm, a box of original yellow Peeps was purchased.  At 1:43pm, two were consumed by yours truly.   Worth it.  Totally worth it.

Tuesday, March 23, 2010

"Doughnut" muffins


Happy Tuesday!  Get ready for the fourth installment in the March doughnut series.  Yes yes, some of you may question the doughnut name if it's not ring-shaped or even fried.  Well, I'll give you that.  But these taste like doughnuts, and isn't that what matters most?  Plus, they are by far the easiest of the five doughnut recipes.  And, probably, the healthiest (relatively speaking).

This is such a quick recipe to throw together, and very versatile.  I'm not a fan of jelly-filled doughnuts, hence the Nutella substitution.  And, by adding the filling before baking, you avoid having to fill baked muffins with a pastry bag and the mess that would probably ensue.  Too much fuss, really.  The wonderful thing about these "dough-muffins" is that they are great make-ahead treats (since they aren't fried) if you have guests coming for breakfast or a dessert date. 

A few notes: Make sure you grease the muffin pan well if you choose to do without paper liners.  Trust me, it'll make removing and handling the hot muffins easier later.  As for assembly, fill the cups first, then add filling, and finally cover the filling.  If you let the filling sit too long, it will slowly start to sink down into the muffin batter and you'll end up with Nutella sticking to the bottom of the pan.

[secret little pocket of Nutella]

[hidden Nutella]


[peek-a-boo!  warm, oozing Nutella]

Nutella-filled "Doughnut" Muffins
(adapted from here)
-makes 10

1 3/4 cups all-purpose flour
1 1/2 teaspoons baking powder
1/2 teaspoon salt
1/2 teaspoon ground nutmeg
1/4 teaspoon ground cinnamon
3/4 cup granulated sugar
1/3 cup vegetable oil
1 egg
3/4 cup milk
Nutella (or filling of your choice -- jam, jelly, preserves)

For topping:
1 Tablespoon unsalted butter, melted
2 Tablespoons granulated sugar + 1 teaspoon cinnamon, whisked together in small bowl

Preheat oven to 350F.  Fill a standard 12-cup muffin pan with paper liners OR coat with nonstick cooking spray; set aside.  In a large bowl, whisk together flour, baking powder, salt, nutmeg and cinnamon.  In another bowl, whisk together sugar, oil, egg, and milk.

Stir wet ingredients into dry ingredients until just incorporated.  Fill each muffin cup just under half full.  Add a teaspoon of Nutella (or your chosen filling) in the center on top of the batter of each cup.  Add just enough batter to cover filling, but not exceeding 3/4 of the cup's volume.  Bake at 350F degrees for 20 to 25 minutes, rotating pan halfway through, or until a toothpick comes out clean.

With melted butter in one small bowl and cinnamon sugar in another, immediately remove each muffin from pan (be careful as these will be hot!), brush top of each muffin with butter and dip in cinnamon sugar.

Serve immediately or store in a sealed container for up to 2 days.  If you like your "dough-muffins" warm and the Nutella center slightly oozing, microwave for 20-30 seconds.  Simply delicious!

Monday, March 22, 2010

Weekend + maple-marinated salmon

Oh Monday, here you are to greet us with rain and cooler air.  Hey, it's not that bad.  Personally, I'd rather be at work on a dreary day like today rather than any one of the warm, bright days we've had in the past week.  Rain always puts me in a productive mood.  Clean, cook, read, run errands and then, having earned it in my mind, collapse onto my couch and zone out with some mindless TV and eat something sweet.  Or, you know, work a standard day and then zone out.

But goodness, what a weekend it was!  I was outside every chance I got, even trying to eat outside when possible.  Strolled around Shadyside and Squirrel Hill to catch up on my vitamin D.  Had me some strawberry cheesecake gelato (yum!) at Mercurio's.  Got my tart pan from Williams & Sonoma.  Had a nice book club meeting outside.  The only change of plans was regarding Sunnyledge Inn.  According to the receptionist, they are still "on winter hours" and "don't do dinner" and "weren't sure when that'll change"... whatever that means?

So, we met up with some friends at Double Wide Grill for a late (and delicious) dinner.  I'm such a sucker for outdoor dining, so this place was right up my alley.  I got the Barbeque Pulled Porky.  Aside from making a fool of myself and asking the waiter for the other slice of bread, only to have him tell me that it's an open-faced sandwich, I was totally in love with my meal.  Crispy shoestring fries, and a flavorful meaty pulled pork.  Some pulled pork tends to be heavy on the sauce, to slimy, and light on the meat.  Not this baby.  Tons and tons of meat.  Loved it.  In fact, out of 8 people, 7 completely cleaned their plates (like, not a crumb left clean).  The only one that didn't had a salad, so we shouldn't even count him :)  Have any of you been here?  What did you think?

Yesterday I did some cooking for the week ahead and was playing around with marinades for chicken and salmon.  This was one such experiment that went very well.  The great thing about marinating anything is convenience.  Most you can make ahead, and along with the meat, put in a sealed container in a refrigerator for up to a day and cook immediately.  I only let this marinade for about an hour while I was doing other things around the apartment.  Easy.  The maple gives the salmon a nice caramelized thin crust while the "wooster" (how I said it when I was younger and how I choose to say it now) sauce and ground ginger give the fish a nice warmth and depth of flavor.

[rather basic pantry staples]


Maple Marinated Salmon
-enough for four 4-ounce pieces (I halved since I only had two)

1/4 cup real maple syrup
1 tablespoon lemon juice
2 tablespoons Worcestershire (or soy) sauce
1 teaspoon Dijon mustard
1/4 teaspoon ground ginger

In whatever container you plan on using, whisk together all ingredients.  Using tongs, place fish in marinade, and flip to coat other side.  Seal container.  Store in refrigerator for up to two hours.  Preheat oven to 400F degrees.  Remove fish from marinade with tongs and place on a foiled baking sheet.  Cook 15 minutes.  Enjoy with a green vegetable of sorts -- I chose steamed edamame. 

[marinade + salmon + container]

[this is going to be one delicious lunch at work] 


What did you do this weekend?  Was it gorgeous where you were?  According to my Dad who is in Tampa this week on business, they were thunderstormed off the golf course.  Oh, karma :)

Friday, March 19, 2010

Working for the weekend

It's amazing, for how much I love love love making and following lists, that I haven't posted more on here. Well, let's open that can of worms today, shall we?  Things I'm looking forward to this weekend, particularly:

1. First and foremost, the weather. Oh my gosh, the weather. Can you believe it's still technically winter (okay, for one more day) and it's been in the mid 60s most days this week? Unreal.

2. Warm weather naturally means ice cream season. Yes, in March.  Ice cream season for me starts on the first 60+ degree day and goes until well... there is snow on the ground or I can't feel my fingers when I'm holding the ice cream. I've already been to Dave & Andy's twice in a week. I think it's time for some gelato on Walnut Street.  If you have never been there, I highly recommend it.  They charge by weight, not size (genius!) and have a minimum of 20 flavors every day.


3. Finally snatching up a rectangular tart pan that I've been courting for months.  And it seems that every time I get close to buying one, I think, "Nah, you won't use this that often, and you make quiches in pie plates anyway."  Well, pan, get ready to come home with me!  With asparagus season just around the corner and many recipes waiting in the wings, I can't get my hands on that pan soon enough.  Plus, I just love the fluted edges of the pan that make a pie crust even prettier and more irresistible.

4.  Some browsing the shops on Walnut is obviously mandatory since I'll already be there.  And J. Crew, you should know I'll be watching you carefully.  After offering an item like this for sale, I'm starting to question the very reason I sing your praises.  I mean, honestly, what on earth is that thing?  And in what obviously confused yet preppy-by-nature corner of your mind did you think making such a garment was a good idea?  Tsk tsk.

5. Book club meeting on Sunday to discuss A Single Man by Christopher Isherwood.  Check it out!  And I've been told that Colin Firth's performance in the movie adaptation is fabulous.

6. And, last but certainly not least, a nice little dinner date at Sunnyledge Inn.  I'll be sure to report on this little gem next week.

7. Really last, this time.  Have a great weekend and happy (early) spring!

Thursday, March 18, 2010

Triumphant treadmill

Dear treadmills,

A few months ago, I may or may not have complained up a storm about you at my gym.  And, on further reflection, you really didn't deserve such a verbal lashing.  It's more the gym environment that I have issues with (i.e. hot, stinky, poor circulation, crowded).  You're doing the best you can with what you've been given.

To be honest, I'd like to reevaluate our relationship.  I know I usually abandon you at the sight of an available elliptical, gazelle, spin bike, or even stepper, even if we've only spent a few minutes of an incomplete workout together.  It's because in your very basic state, well, you're boring.  And I need constant distractions when staring at the back of other people exercising... can you blame me?  But, I think I've found the solution.

These workouts I've been finding/adapting lately really make me appreciate our time together.  I now see that I'm benefiting from our relationship.  In fact, last week I did the same workout three times in a row (see workout below) just to spend more time with you.  I hope this is merely the beginning of the positive steps we can take together.

All my love,
Katy

P.S. Don't take it personally when the weather gets nice and you see less of me.  I'll be spending lots of time outside.  But hey, it's not just you!  It's the whole gym.  You'll just have to learn to come out of your shell and socialize with others.


Time                           Speed                  % Incline
0:00-3:00                     3.5                          1
3:00-3:30                     4.0                          2
3:30-4:00                     4.0                          4
4:00-4:30                     4.0                          6
4:30-5:00                     4.0                          8
5:00-6:00                     5.5                          1
6:00-7:00                     4.0                          1
7:00-7:30                     5.0                          2
7:30-8:00                     5.0                          4
8:00-8:30                     5.0                          6
8:30-9:00                     5.0                          8
9:00-10:00                   4.0                          1
10:00-11:00                 6.5                          1
11:00-12:00                 4.0                          1
12:00-12:30                 5.5                          2
12:30-13:00                 5.5                          4
13:00-13:30                 5.5                          6
13:30-14:00                 5.5                          8
14:00-16:00                 4.0                          1
16:00-17:00                 7.0                          1
17:00-20:00                 3.5                          1

Wednesday, March 17, 2010

Saint Patrick would love this bread

Ah, it's March 17th.  A day when it's more than acceptable expected for a person to scramble to find any possible connection with Ireland.  Half Irish?  Even a quarter?  Maybe no family history but a friend of your old neighbor vacationed there a few years ago?  Close enough!  Being in Pittsburgh, a city that certainly revels in its Saint Patrick's Day (or the weekend before) celebrations, one might just think it's an excuse to consume an excess of alcoholic beverages.  Well, yes, but it's so much more.

Actually, this day that honors one of the patron saints of Ireland was formerly a Christian holiday that eventually became an official feast day in the early 1600s.  In the year 432, Patrick, now a bishop, claims that he was called back to his homeland of Ireland to convert both the rich and poor -- his mission was successful.

A few other random facts:
--That little green symbol we all associate with March 17th?  Irish folklore tells that one of Patrick's teaching methods included his use of the shamrock to explain the Holy Trinity to the pre-Christian Irish people.
--Blue was the first color associated with Saint Patrick.  However, with the increase in popularity of the shamrock as an image of the holiday, the color green was adopted as early as the 17th century.
--Pittsburgh hosted its first Saint Patrick's Day parade in 1869.  The first recorded parade, at least in the States, was held in Boston in the year 1737.  No surprises there.

Okay, okay, on with the food!  [triumphant march]  First and foremost, this bread shouldn't be hidden away 364 days a year, only to be unveiled on March 17th and never to be seen again until the next year.  It's a fantastic breakfast bread.  Or, as my friends from Friday night Hillel dinners would say, a perfect "pick apart and hollow out with your fingers" bread.  You can take the more mature route of cutting clean pieces, but something about diving into a loaf of rustic, warm bread with friends around a table just sets a perfect scene of comfort and good cheer.  The Irish wouldn't have it any other way, would they?

Notes: The original recipe calls for 2 tablespoons of caraway seeds.  The first time I made this I followed every last detail, but I've made very detailed notes to cut back on the caraway seeds -- they have a very strong flavor.  But if you're a fan of anise flavor (think the predominant taste in rye bread), by all means, use the full amount.

[powerful little seeds]

[the raisins add little pockets of moisture to the bread]

[fold fold fold! and resist the urge to overmix the dough]

[beautiful round raisin-studded soda bread]


Irish Soda Bread
(adapted from Martha Stewart's Baking Handbook)
-makes one 8-inch loaf

4 cups all-purpose flour
1/4 cup granulated sugar
1 tablespoon caraway seeds
2 teaspoons baking powder
1 teaspoon salt
4 tablespoons unsalted butter, cold, cut into small pieces
2 cups raisins (I used regular, but any kind will do)
1 large whole egg, plus 1 large egg yolk
scant (just less than) 1 1/2 cups buttermilk
1 teaspoon baking soda
1 tablespoon milk

Preheat oven to 350F. Line a baking sheet with parchment paper and set aside.  In a large bowl, whisk together flour, sugar, caraway seeds, baking powder and salt.  Using a pastry blender or fork, cut in the butter until the mixture resembles coarse crumbs with a few scattered large clumps remaining.  Stir in raisins.

In a medium bowl, whisk together whole egg, buttermilk, and baking soda until combined.  Pour egg mixture into the flour mixture and, using a rubber spatula, fold in, working in all directions until all crumbs at the bottom of the bowl are moist and dough comes together.  Dump dough onto center of lined baking sheet and, with lightly floured hands, form dough into a round domed loaf, about 8 inches in diameter.

In a small bowl, lightly beat together the egg yolk and milk, and brush over the entire loaf.  With a sharp knife, cut a cross, about 3/4 inch deep, in the center of the top of the loaf.  Bake, rotating sheet halfway through, until deep golden brown and a cake tested inserted in the center of the loaf comes out clean, about 1 hour and 10 minutes.  Transfer the bread to a wire rack to cool completely.  (Optional: For some extra indulgence, I brushed melted butter over the top of the bread when it first came out of the oven.  Not necessary, but when did butter ever ruin anything?)

This bread, like all breads in my opinion, is best eaten warm the day it was baked.  However, it will keep at room temperature, wrapped well in plastic, for up to 5 days.  Don't hesitate to microwave a piece of bread for a few seconds to warm and slather with butter or your favorite preserves... or, heck, Nutella.  Mm, that reminds me.  I need to pick up some Nutella from the store this weekend.

Happy Saint Patrick's Day, one and all!  A wonderful coworker brought in Eat 'n Park shamrock smiley cookies.  Helloooooo, morning snack:

How are you going to celebrate today?

Tuesday, March 16, 2010

Apple cider doughnuts

We're halfway through it -- doughnut month March!  I've done traditional yeast doughnuts, chocolate doughnuts and now for something a little more grown-up and subtle: apple cider doughnuts.  "But, Katy," you say.  "Apple cider is for the fall."  Oh, is it, friend?  I beg to differ.  Apple cider is available all year in most grocery stores and probably gets lonely around February, when people are longing for warmer weather, time in their gardens, and outdoor barbeques and fresh produce.  Well, apple cider, you can just call me your hero, for I shall sing your praises any ol' time of the year!

These doughnuts are of the cake variety, like their chocolate cousins of last week's feature.  The apple cider reduction gives a very subtle flavor.  I personally didn't get much of the apple flavor with the plain cinnamon sugar topping, so I opted for the apple cider and powdered sugar glaze to amp up the apple factor.  Also good -- applesauce for dipping the plain doughnuts.  And, as always, these ringed delights are best served warm or within a few hours of being made.  Though one or two may have disappeared around breakfast time the next day.  There must be a doughnut gnome somewhere in my apartment.  Sheesh.

[dough to be chilled]

[stupid, poorly-lit apartment]

[cinnamon sugar, glazed, cinnamon sugar]

[look at the fluffy hollow interior!]

Notes: I halved the recipe since there are still two more weeks of doughnuts left... and it's officially ice cream season in Pittsburgh.  Also, since buttermilk isn't a refrigerator staple of mine and I'd imagine the same goes for most people, here is a way to make it at home (adjust amounts based on how much you need but the ratio should be kept constant): 1 cup of milk + 1 Tablespoon lemon juice = 1 cup buttermilk 


Apple Cider Doughnuts
(seen here, apparently adapted from Lauren Dawson at Hearth Restaurant)
-makes 22 doughnuts + 22 doughnut holes, using a 3-inch biscuit cutter and rolling/reusing scraps
1 cup apple cider
3 1/2 cups flour, plus additional for the work surface
2 teaspoons baking powder
1 teaspoon baking soda
1/2 teaspoon ground cinnamon
1/2 teaspoon salt
1/8 teaspoon ground nutmeg
4 tablespoons (1/2 stick or 2 ounces) butter, at room temperature
1 cup granulated sugar
2 large eggs
1/2 cup buttermilk
Vegetable oil, for frying

Optional toppings:
--Glaze (1 cup confectioners’ sugar + 2 tablespoons apple cider)
--Cinnamon sugar (1 cup granulated sugar + 1 1/2 tablespoons cinnamon)
--Light dusting of powdered sugar

In a small saucepan over medium or medium-low heat, gently reduce the apple cider to about 1/4 cup, 20 to 30 minutes.  Set aside to cool.

In a large bowl, whisk together flour, baking powder, baking soda, cinnamon, salt, and nutmeg.  Set aside.
Using an electric mixer on medium speed (with the paddle attachment, if using a standing mixer) beat the butter and granulated sugar until the mixture is smooth.  Add the eggs, one at a time, and continue to beat until the eggs are completely incorporated.  Scrape down the sides of the bowl as needed.  Reduce the speed to low and gradually add the reduced apple cider and the buttermilk, mixing just until combined.  Add the flour mixture and continue to mix just until the dough comes together.

Line two baking sheets with parchment or wax paper and sprinkle them generously with flour.  Turn the dough onto one of the sheets and sprinkle the top with flour.  Flatten the dough with your hands until it is about 1/2 inch thick. Use more flour if the dough is still wet.  Transfer the dough to the freezer until it is slightly hardened, about 20 minutes. Pull the dough out of the freezer. Using a 3-inch round cutter for the outer shape and a 1-inch round cutter for the hole (a water bottle cap is my trusty center), and cut out doughnut shapes. Place the cut doughnuts and doughnut holes onto the second sheet pan.  Refrigerate the doughnuts for 20 to 30 minutes. (You may re-roll the scraps of dough, refrigerate them briefly and cut additional doughnuts from the dough.)

Add enough oil or shortening to a deep-sided pan to measure a depth of about 2 inches.  Attach a candy thermometer to the side of the pan and heat over medium heat until the oil reaches 350°F.  Have ready a plate lined with several thicknesses of paper towels and a cooling rack over a cookie sheet.

Make your toppings if you are using any.  While the cut doughnut shapes are in the refrigerator, make the glaze by whisking together the confectioners’ sugar and the cider until the mixture is smooth; make the cinnamon sugar by mixing the two together. Set aside.

Carefully add a few doughnuts to the oil (I did one at a time in a small saucepan), being careful not to crowd the pan, and fry until golden brown, about 60 seconds. Turn the doughnuts over and fry until the other side is golden, 30 to 60 seconds.  **Watch carefully, as your doughnuts' cooking time may differ.** Drain on paper towels for a minute after the doughnuts are fried.  Transfer to cooling rack for a few minutes.  Dip the top of the warm doughnuts into the glaze or cinnamon sugar mixture (if using) and enjoy immediately.


Doughnut month observation: It seems like people really want to visit me on doughnut-making nights, so if you're looking to play hostess, this is a good trick :)

Monday, March 15, 2010

Glorious chocolate cupcakes

Starting out the week the right way -- with chocolate.  Because losing an hour of sleep may or may not have thrown you for a slight loop this weekend.  And because these amazing chocolate cookies didn't quite satisfy your craving for chocolate.  I present to you the quintessential chocolate cupcake (or cake, for that matter).  You probably saw these cupcakes in the Oscars party post, and they are certainly worthy of multiple awards.  They are flavorful and chocolatey to the core without being too sweet.  Moist and fluffy rather than dry and dense like many chocolate cakes tend to be.  Oh, and they truly require one bowl.  Talk about a winner of a recipe.

Note: I've used this recipe for mini cupcakes, round layer cakes, large rectangular cakes, you name it.  For mini cupcakes, I'd cut the baking time down to about 15 minutes per cupcake and start checking the center with a toothpick from there.  For cakes, a full recipe makes two 9-inch round cakes, and make sure to adjust cooking time to 30-35 minutes and check with cake tester until done.

[my kind of statuette]

[lots of love, Milton Hershey]

[prepared for battle]


One Bowl Chocolate Cupcakes
(from the Martha Stewart Baking Handbook)
-makes 30 standard size cupcakes (I halved this for the party and got 15)

2 1/2 cups all-purpose flour
1 1/4 cups cocoa powder
2 1/2 cups granulated sugar
2 1/2 teaspoons baking soda
1 1/4 teaspoons baking powder
1 1/4 teaspoons salt
2 large whole eggs + 1 large egg yolk
1 1/4 cups milk
1/2 cup + 2 Tablespoons vegetable oil
1 1/4 teaspoons pure vanilla extract
1 1/4 cups warm water
Icing of your choice, perhaps this recipe for buttercream

Preheat oven to 350F.  Line two standard 12-cup muffins pans with paper liners (see pretty gold ones for the Oscars, of course).  Into the large bowl of an electric mixer, whisk together flour, cocoa, sugar, baking soda, baking powder, and salt.  Attach bowl to the mixer fitted with the paddle attachment (or regular beaters on your hand mixer) and add eggs and yolk, milk, oil, vanilla, and warm water.  Beat on low speed until smooth and combined, roughly 3 minutes.  Scrape down the sides of the bowl as needed.

Fill each paper liner roughly 2/3 full of batter.  Bake, rotating pans halfway through, until a cake tester or toothpick inserted in the center of a cupcake comes out clean, 20 to 25 minutes.  Cool pans on rack for roughly ten minutes.  Remove cupcakes in liners from pan carefully and place onto rack to cool completely, top sides up.

Frost cupcakes to your fancy.  I'll admit I cheated and bought coconut-pecan frosting from the store, to make these more German.  I used my trusty ice cream scooper to portion out icing with the intention of spreading it over the whole top of the cupcake, but it looked so artsy that I left it that way.  Cupcakes can be refrigerated in an airtight container for up to 5 days (but good luck getting them to last that long).

Friday, March 12, 2010

Baked zucchini chips

As much as I love to cook, there are times when I don't really want a full sit down meal.  I want to make something little, nibble at it, and maybe have another little snick-snack later if the mood strikes me.  Last night was one of those nights.  I went on a delightful and rather impromptu date with two friends to ride the Duquesne incline and appreciate the warm weather before the onslaught of rain headed for Pittsburgh this weekend.  Seriously, the way the local news programs are talking about this and potential snow thaw runoff, you'd be tempted to construct an ark.  No?  Just me?  Shhh.


Since my get-home-from-work-and-immediately-run-out-the-door snack was a few Girl Scout cookies, I figured I should sneak a vegetable of sorts into my evening somehow.  I had a lone zucchini sitting in my fridge and hey, that's good for many things!  I didn't have the patience (hey, the puck was dropping in 15 minutes for the Pens game) or supplies to whip up a summery squash pizza.  A quick look through my cabinets and refrigerator had me grabbing two important kitchen staples: Parmesan cheese and seasoned bread crumbs.  Never underestimate what you can do with what you already have.


Baked Zucchini Chips

1 zucchini, rinsed
1/4 cup Italian seasoned bread crumbs
(if you have unseasoned bread crumbs, try adding garlic and onion powders, dried parsley, black pepper and/or paprika... but the Italian mixture is so readily available and versatile, go for it)
1 egg white
Parmesan cheese (optional)

Preheat oven to 450 F.  Slice zucchini as thinly as possible (the thinner the slices, the crispier the chips).  Place slices on a dish or paper towel for at least 10 minutes to let moisture drain out of the slices.  If using plain bread crumbs, mix those with other dry ingredients in a small bowl.  In another bowl, whisk the egg white until foamy.  Set aside.


Dip each slice of zucchini into the egg white mixture, let excess drip and coat in the bread crumb mixture.  Place on a baking sheet in a single layer.  Bake for 7 minutes, remove baking sheet and flip zucchini chips to other side.  Bake for another 7 minutes.  Check crispness of chips.  Return to oven for another 5 minutes or as long as desired.  Remove baking sheet to cooling rack and grate Parmesan cheese over chips for a little gourmet touch.  Serve immediately.


A perfect hockey game snack and, you know, it's a vegetable that's not fried and still delicious!  [gasp]

Thursday, March 11, 2010

Macaroni and cheese

Can you believe this weather?  I'm finding that this working a full-time job is really hindering the time I can be outside walking, jogging, and drawn to sweet shops of all sorts.  When I walk to work it's around 35 degrees and, by lunchtime, it's up to the mid 60s.  Unreal!  Did we just go from winter to spring literally overnight?  If so, Mother Nature, you should know that it's fine by me.  Yes yes, I know I am probably snow's #1 fan, but this week's abundance of sunshine has put me in warm weather mode.  Naturally, because I said that, it's going to snow next week.  Go ahead, blame me.

Alright, enough small talk.  Down to business with this macaroni and cheese recipe.  If you read the Oscars party post, you caught a glimpse of the best homemade macaroni and cheese ever.  Seriously, I'm talking in the history of mac and cheese... since the beginning of time, way before that blue box cop-out that a certain friend can't live without (you know who you are, and yes I just judged you accordingly).  Thousands of cooks across the interwebs have said this is the best of the best.  This is another recipe I've had saved for, oh, at least six months.  After making this, I deserve some kind of slap to the face for not making it sooner.

I'll admit that I don't have much experience with Gruyere cheese, so when I saw it listed in the ingredients, I was a little nervous.  The same goes for white cheddar.  But wow, the two cheeses and the bechamel sauce made the creamiest and most flavorful mac and cheese I've ever had.  The homemade bread crumbs on top added a surprising crunch to the gooey cheese and noodle mixture under them.  Not enough cheese for you?  Add a sprinkling of cheese on top of the sauce and noodle mixture before you add the bread crumbs.  Oh my gosh.  Do yourself a favor and make this immediately.  Seriously, people!  What are you waiting for?  Go!  Mush!  Now!

Note: I halved this recipe and used a 2-quart 8-inch x 11 1/2-inch rectangular glass dish.  Per the recipe, it should've made 6 servings.  Uhhh, I don't know about you, but this lasted through the Oscars party (granted, smaller servings were taken) and three one person dinners.  Anything green side dish will complement this nicely: steamed broccoli, a crunchy spinach and romaine salad, fresh green beans, you name it.  Oh, and if you go to the grocery store and see much bigger quantities of the cheese than you need, don't be afraid to ask them to cut you a smaller piece.  I've found the cheese counter experts at Market District to be extremely helpful.

[carbohydrate love affair]

[cheese for the sauce and topping, separated]

[2% milk and a ton of cheese does a body good]

[making the sauce]

[love at first sight]

[almost there]


Martha Stewart's Creamy Macaroni and Cheese
-serves 12 (or 6-ish if halved)

8 tablespoons (1 stick) unsalted butter, plus more for casserole
6 slices white bread, crusts removed, torn or cut into 1/4" to 1/2" cubes (I used honey wheat bread)
5 1/2 cups milk
1/2 cup all-purpose flour
2 teaspoons salt, plus more for water
1/4 teaspoon ground nutmeg
1/4 teaspoon freshly ground black pepper
1/4 teaspoon cayenne pepper [optional - I left this out and no one seemed to care]
4 1/2 cups (about 18 ounces) grated sharp white cheddar cheese
2 cups (about 8 ounces) grated Gruyère
1 pound elbow macaroni

Preheat oven to 375°F.  Butter a 3-quart casserole dish and set aside.  In a medium microwave-safe bowl, melt 2 tablespoons of butter.  Add bread crumbs and toss to evenly coat.  Set aside.

Warm the milk in a medium saucepan over medium heat.  Melt the remaining 6 tablespoons butter in a high-sided skillet or large pot over medium heat. When the butter bubbles, add the flour.  Cook, stirring, 1 minute.  (Don't worry if small clumps appear, they will go away when the milk is added.)  While whisking, slowly pour in the hot milk a little at a time to keep mixture smooth.  Continue cooking, whisking constantly, until the mixture bubbles and becomes thick, 8 to 12 minutes.  (Really, no stepping away to check your email here.  Constant attention.)

Remove the pan from the heat.  Stir in salt, nutmeg, black pepper, 3 cups cheddar cheese, and 1 1/2 cups Gruyere; set the cheese sauce aside.

Fill a large pot with water, salt, and cover and bring to a boil.  Add the macaroni and cook for 2-3 minutes, no more.  (The macaroni will continue to cook and soften in the oven.)  Drain the macaroni in a colander and rinse under cold water.  Again, drain well and stir macaroni into the cheese sauce you previously set aside. 

Pour the mixture into the buttered dish.  Sprinkle the remaining 1 1/2 cups cheddar cheese, 1/2 cup Gruyere, and the breadcrumbs over the top.  Bake until golden brown, about 30 minutes, but start checking around 25. Transfer the dish to a wire rack to cool for 5 minutes.  Serve and, remember, sharing is caring.

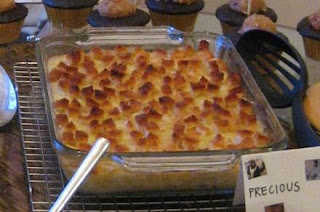
Oh, and I have a confession.  I never took a final picture of the dish in my apartment.  I made it, and then J came over to bake the kugel and I wrapped it up to go to the party.  Forgive me, please.  (I am certain you will upon tasting this deliciousness.)

Wednesday, March 10, 2010

Shamrock shake

Well, that was simply craptastic.  I had my first and certainly last McDonald's Shamrock Shake of the season... and my life.  It was awful!  I could've just ordered a glorious vanilla milkshake, or gone next door to the beloved Oakland staple ice cream shop Dave & Andy's.  [sigh]

See, last year I had my very first SS at the behest of friends telling me how good it was, and since I loved mint-flavored things I would really appreciate the SS.  I remember having about three sips (is it a "sip" when it's a thick ice cream-ish liquid through a straw?  If not, someone please invent a word for this and I'll be eternally grateful) and throwing it away in disgust.  It had a vague minty flavor with some funky fruity aftertaste.  I chalked it up to the fact that it was two days after St. Patrick's Day and maybe, just maybe, the supplies were running low so it was a poor example of the SS's quality.


I gave it another try this year.  Same gross taste.  Oh and the color isn't nearly as pretty as that of the SS in the picture above.  It's more like highlighter green with swirls of white.  But maybe this is just a location issue?  Or does the Shamrock Shake always taste like this?  I want your feedback!  I'm doubtful that my taste buds are faulty... :)